Topics
Diagnosis
Air conditioning in the bespoke HVAC system has worked beautifully, but after installation was completed, there was no heat whatsoever! Since the entire HVAC design is highly customized, a diagnosis required looking at the entire setup.
The first step involved verifying that the basic coolant plumbing was properly installed. A small leak in the sight tube of the Radium expansion tank was repaired, but this provided no solution. Next, a stuck thermostat was suspected; with some difficulty (access to one of the fastening bolts is rather difficult), a new one was installed. Again, no joy.
Finally, a complete pressure test of the cooling system proved that there were no leaks. For some reason, no hot water appeared to be flowing to the heater core. The aluminum feeding inlet tube did not get much hotter than the ambient engine bay temperature, and the outlet tube remained cool enough to touch, even after many minutes of running the engine up to operating temperature.
Several potential causes of coolant blockage were possible — like rubber shipping caps not being removed during assembly — but the primary suspect was the heater control valve unit, a known point of Vintage Air system failure based on various online car forums.
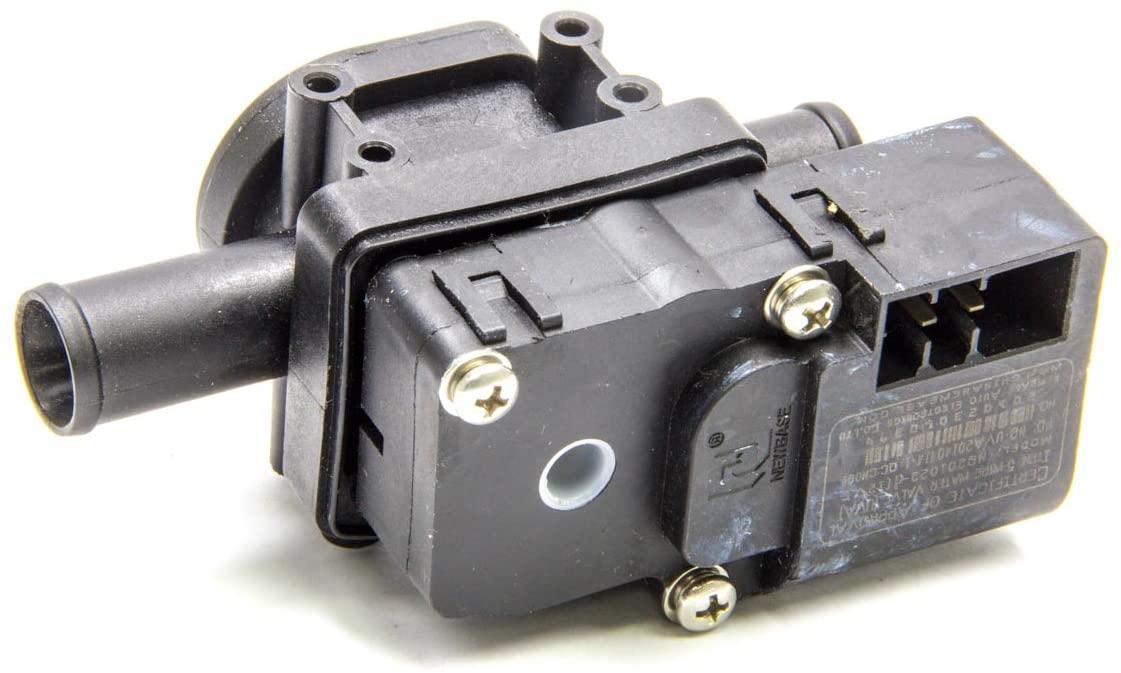
Heater control valve servo
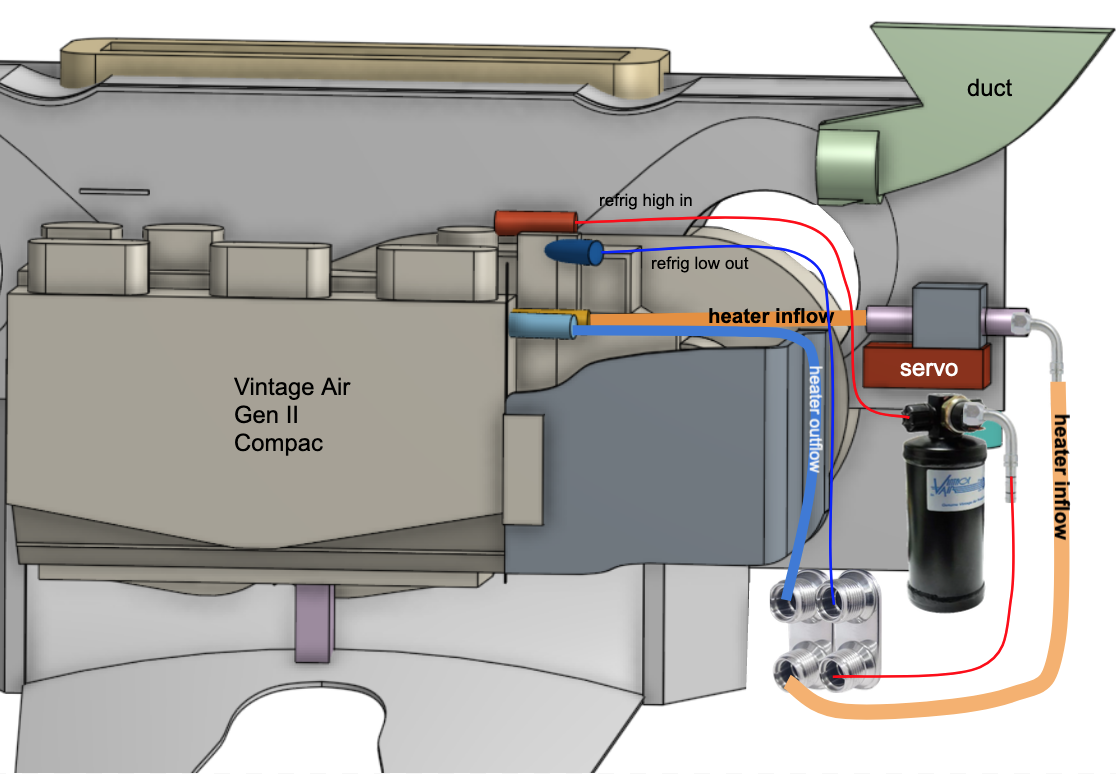
Hot coolant is routed from the engine to a valve that controls the flow into the heater core using a servo mechanism. When the valve is shut, no coolant flows; when the valve is open, coolant flows into the heater core and then back out to the engine.
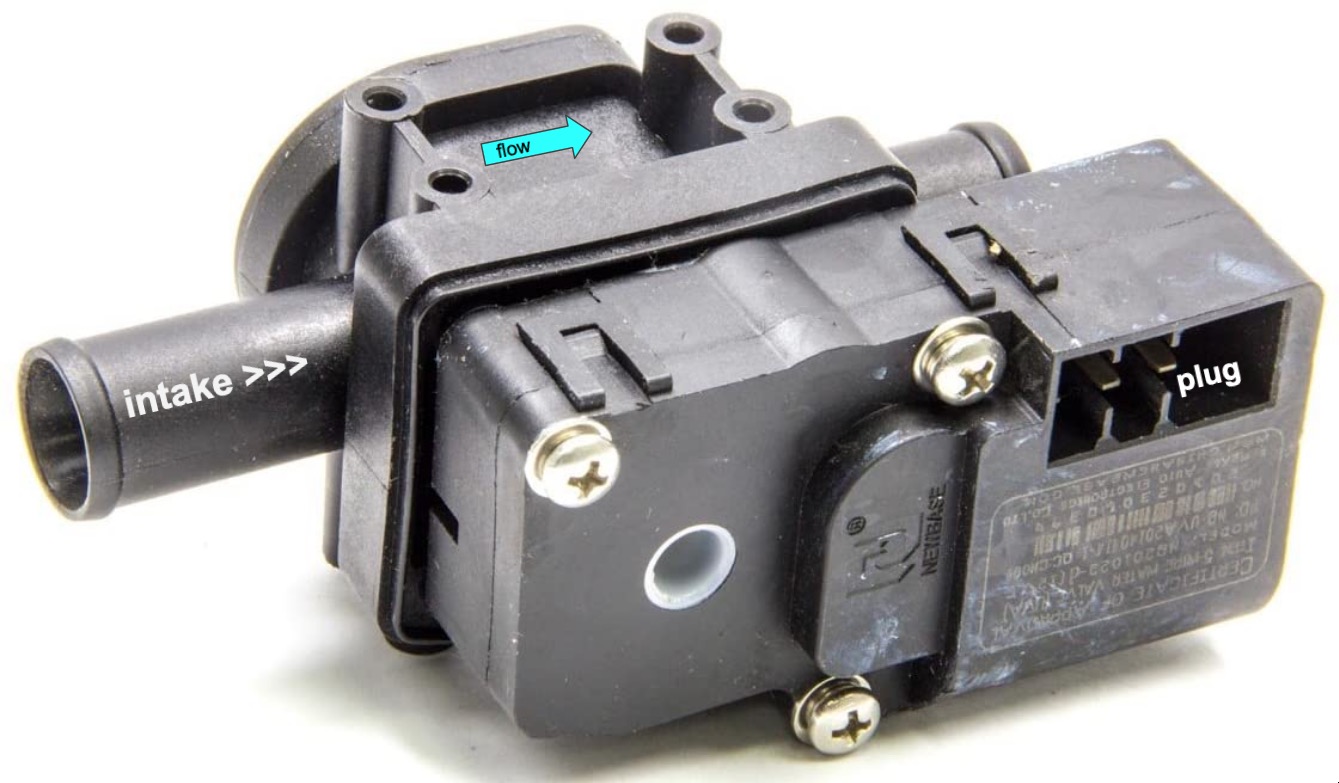
Heater control valve servo flow
The servo is controlled electronically by the Dakota Digital DCC-2200 temperature control unit that communicates with the Vintage Air control unit through a potentiometer three-wire output pigtail.
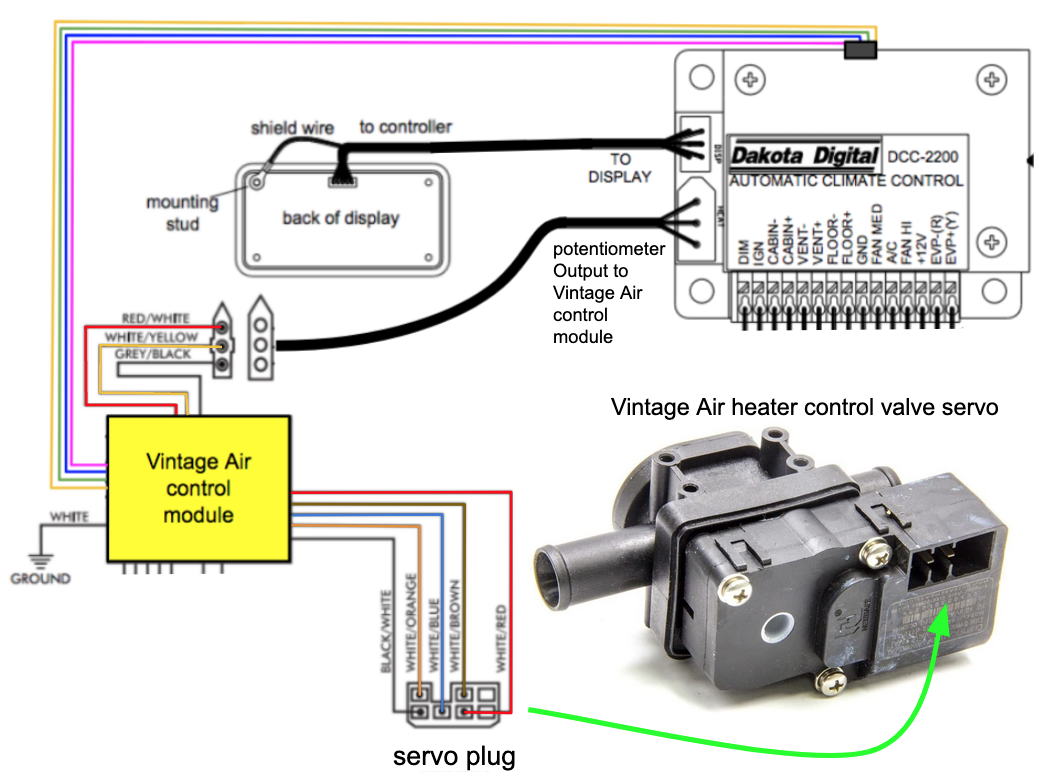
In turn, the Vintage Air control sends signals to the heater servo via a 5-wire plug. Whether the servo is receiving the proper electric signals can be determined by testing voltages at this plug.
Servo plug test
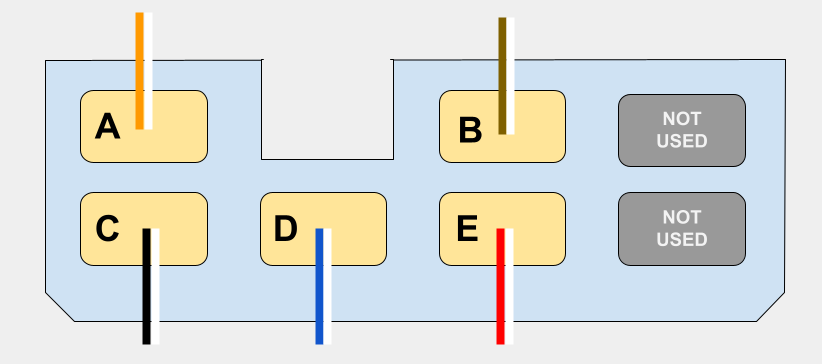
All voltage tests were made with the key on (but engine not running) and low fan speed.
Pins A – B are battery voltage (A is the positive terminal), and the voltmeter displayed the appropriate 12v level. Pins A – C and A – E should have sweep voltages from 0.5 to 11 volts depending on the high and low settings of the potentiometer. Our testing confirmed that the appropriate voltages were sent to the servo unit.
Since the servo is receiving the correct voltages, the fact that the valve does not seem to open implies a mechanical fault inside the mechanism … basically a stuck valve.
Servo valve rotation test
To determine if the valve can be unstuck without replacing the entire unit, the motor housing can be removed so that the exposed valve stem can be rotated left and right. Three bolts hold the servo motor case to the rotating mechanical valve. In our case, the valve stem was extremely stiff. Rotating it about 50 times loosened it up enough to work, but we still elected to install a new valve.
Repeated rotation with finger pressure may free up the valve. If not, the entire unit should be replaced (a chore because coolant must once again be drained and then refilled).

Exposed heater valve stem
If the valve is rotated, make sure to return the stem to its original position so that the servo gearing will remain correctly oriented (otherwise, turning the temperature down may actually cause the heater to start operating as hot coolant flows into the heater core!).
Incidentally, Vintage Air has had historic issues with their heater control valves. Earlier non-servo models repeatedly failed and that presumably motivated the change to servo-driven valves. Vintage Air will replace defective valves at no charge.
New Base valve details
The servo valve in the Vintage Air system is manufactured by Zhengzhou Newbase Auto Electronics based in China. Their 5-wire model has the following specifications.
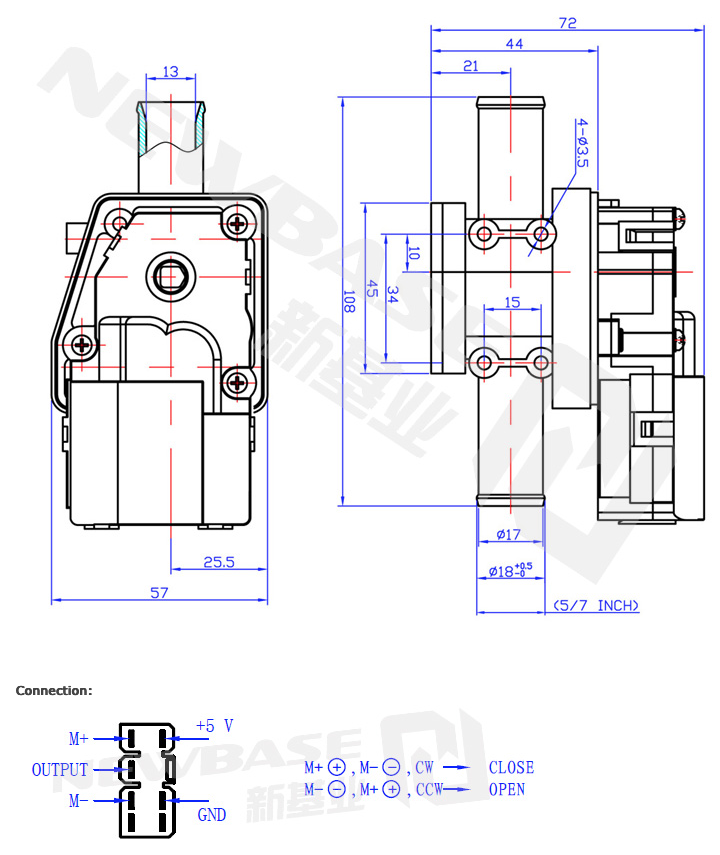
*NOTE: New Base also offers a version with a pigtail instead of a plug
Vintage Air installation
The 461170 heater control value has a small directional flow arrow embossed on the case. Make sure that this points the correct way from the outflow of engine water pump towards the heater evaporator in the dash.
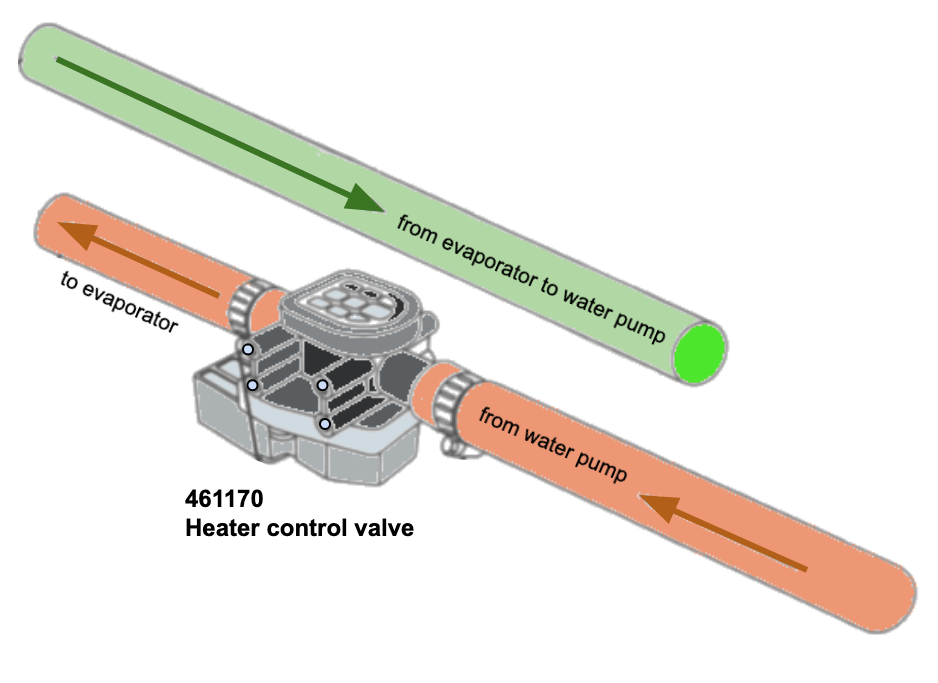
A return hose — without the heater control value — is routed back from the dash evaporator towards the engine block (connected via plumbing eventually to the water pump inflow).
The 461170 HCV supercedes part number 46114-VUH in older Gen II Vintage Air units.
Operational validation
Before installing the new valve, there is a simple test to make sure the servo operates correctly. Simply plug the unit in, move the Dakota Digital temperature control up to 90 degrees (this is the override trigger level that opens the servo valve regardless of outside temperature), and see if the servo moves. You should be able to see through the tube openings to the other side. Lowering the temperature to below the ambient room level should close the value; you can’t see through to the other side.